Despite how simple and cheap it is to offload your DNS records to something like AWS Route 53, I chose to run my own DNS servers. Why you may ask? Just for fun really, and learning. There are plenty of reasons for and against running your own DNS servers, and I’m not trying to convince you that you should, I just wanted to share my experiences. So let’s jump into it.
what is an authoritative DNS server?
There are two main types of DNS servers, authoritative nameservers and recursive resolvers (there’s also root nameservers and TLD nameservers, but let’s ignore that for now).
A recursive resolver is the first hop in a DNS query. It acts as a middleman between a client and a DNS nameserver. After receiving a DNS query from a client, it will either respond with cached data or recursively search for the authoritative nameserver.
The authoritative nameserver is usually the resolver’s last step in the journey for an IP address. The authoritative nameserver contains information specific to the zone it serves (e.g. google.com), and it can provide the IP address of the domain names (that belongs to the zone) a query is looking for.
overview
At a high level, these are the things I need for my setup:
- A domain name (
kevinmingtarja.comin my case), so that I can run an authoritative server for this zone. - Two nameservers,
ns1.kevinmingtarja.com(primary) andns2.kevinmingtarja.com(secondary) for redundancy. The primary acts as the source of truth, and the secondary is just a read replica. - Static public IPs for both of my nameservers.
- Glue records to point to the static IP address of my nameservers (more on that later).
Note: The best practice is actually to hide the primary nameservers from the public, and let only the secondary nameserver(s) to answer queries. This helps to ensure that access to the primary nameserver is as limited as possible, preventing DDoS attacks and bad actors from accessing and tampering the source of truth.
It’s also possible to offload the secondary nameservers to providers like Cloudflare, so that you only need to manage the primary server.
choosing a DNS server
For this project, I evaluated two options, BIND and CoreDNS. BIND is one of the most widely used DNS servers out there, it’s been there since the 1980s, and it has proven to be very reliable. A while back, I also used it in my networking class (CS3103) to setup an authoritative DNS server.
CoreDNS on the other hand is much newer, it was first released in 2016. CoreDNS is a CNCF graduated project, it’s fast and flexible thanks to its plugins architecture, and simple to configure as well. It’s widely used as the cluster DNS for Kubernetes clusters (it’s the default option now for EKS), so I’ve actually been using it on my day to day work, just that its “invisible” to me because so far I’ve never had to configure extra stuff for it to work.
From the start, I knew that I wouldn’t want to deploy this to production without proper monitoring, so one of the things CoreDNS had that stood out to me was its Prometheus plugin, which exposes metrics without any additional configurations. I also really liked the plugins architecture of CoreDNS, as it gives me the flexibility to extend its functionalities by writing Go code, even though I proabably won’t need to anytime soon. There’s also a higher likelihood of me having to deal with CoreDNS in the future due to it’s adoption in the cloud native ecosystem, so having some exposure with it would be good, so I went with CoreDNS.
configuring CoreDNS
The configuration file for CoreDNS is called the Corefile. It defines what servers listen on which ports and which protocol, for which zone each server is authoritative, and which plugins are loaded.
This is the Corefile for my primary nameserver:
# Corefile.primary
kevinmingtarja.com {
    file db.kevinmingtarja.com

    transfer {
        to 3.89.236.104
    }

    health :8080
    prometheus
    log
    errors
}
Here, I define a server block that is authoritative for kevinmingtarja.com. It reads the zone file (more on that soon) from db.kevinmingtarja.com, and then using the transfer plugin, it enables this server to do zone transfers to my secondary nameserver, which has the static IP of 3.89.236.104. The rest are additional plugins that I want to enable like health checks, exposing prometheus metrics, and logging.
For my secondary nameserver, I specify it to be a secondary nameserver for the zone kevinmingtarja.com, and to retrieve that zone from 18.140.254.171, which is the static IP of the primary server. Zone transfers happen through the AXFR or IXFR protocol.
# Corefile.secondary
kevinmingtarja.com {
    secondary {
        transfer from 18.140.254.171
    }

    health :8080
    prometheus
    log
    errors
}
creating the zone file
A zone file is a text file stored in the primary DNS server that contains all the records for every domain within the zone. Here is a snippet of my zone file.
$ORIGIN kevinmingtarja.com.
$TTL 3600
@       IN  SOA ns1.kevinmingtarja.com. kevin.mingtarja.gmail.com. (
                2023101601  ; serial
                3600        ; refresh
                900         ; retry
                604800      ; expire
                86400       ; minimum
                )

        IN  NS  ns1.kevinmingtarja.com.
        IN  NS  ns2.kevinmingtarja.com.

ns1     IN  A   18.140.254.171
ns2     IN  A   3.89.236.104

...     ... ... ...

www     IN  CNAME  ...
Some important things to note:
- Zone files must always start with a Start of Authority (SOA) record, which contains important info about a zone such as the email address of the administrator, when the domain was last updated, etc.
@is used to denote the current origin.- The
.(dots) at the end of lines are not typos, it denotes that the domain name is absolute, and not relative to the origin.
The exact specs can be found in section 5 of RFC 1035.
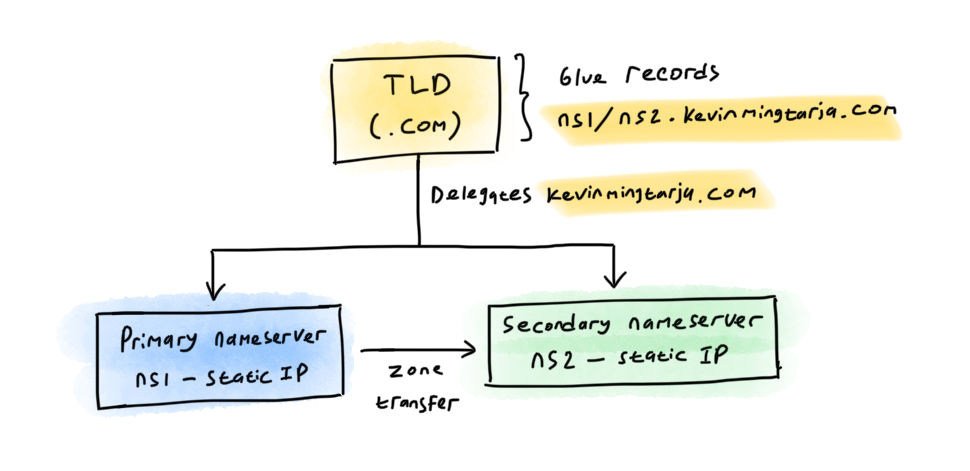
glue records
Now, notice that someone trying to resolve www.kevinmingtarja.com needs to first resolve ns1.kevinmingtarja.com (or ns2), but since ns1 is inside kevinmingtarja.com, this requires resolving kevinmingtarja.com, thus creating a circular dependency.
To break this dependency, we need to tell the nameserver of the top level domain (.com in this case), whose job is to delegate queries to the correct authoritative nameserver, that ns1.kevinmingtarja.com (and ns2) lives on this particular IP address. These records are called glue records.
This is usually done through the web admin interface of your domain’s registrar.
next steps
Now, what’s left is to spin up two VMs, run CoreDNS there, assign it with static IPs, and set up monitoring and alerting! I will go over these in detail in a follow up blog post, so do keep an eye out for that.
Thank you for reading, and feel free to leave any comments, questions, suggestions to my email kevin.mingtarja@gmail.com :)